Even as we rely more and more on digital devices, it seems everyone has a pad of paper close by. And why not? It’s often easier to jot down a note than pull your phone out of your pocket, unlock it, find the text app and start typing. What if you’re talking on the phone? The point is, pads of paper still have a place in society.
Making those paper pads is easy and economical. Elementary school art classes can easily add a padding project to the curriculum. But it’s also a nice offering for print shops. Inexpensive tools exist to produce professional results
The Process
Whether you make hundreds of pads in your business, or one in your kitchen, the process is the same; clamp a stack of paper together and apply glue to one edge. The tools you use determine how easily and efficiently you can produce them.
As you might imagine, there are many high-quality tools and machines available to make the process of padding paper a snap. If you own a print shop, padding can be a nice revenue stream that doesn’t require much investment in equipment or supplies. Depending on your demand, there are several different types of padding machines, from manual to fully automatic.
Start Small
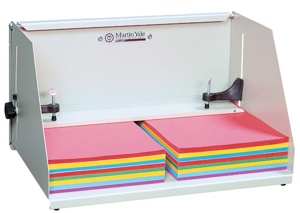 The manual variety, shown here, allow you to stack many pads together for efficiency, then simply cut them apart when the glue dries. Yes, there’s a tool for that, too. You can find padding presses of varying sizes, from tabletop clamping jigs to large units on casters that tilt and spin.
They all work essentially the same. There is some sort of base and backstop so you can place your pads evenly. Then use the integrated clamp to press the pads, remove the back panel and glue the pads with commercial grade padding compound.
You can find manual padding presses for a little over one hundred dollars, all the way up to around a thousand dollars for free-standing units capable of padding a stack of paper 30+ inches high.
Full Steam Ahead
Automatic padding machines use hot melt adhesive to quickly bind individual pads, then just as quickly cool the adhesive to create a continuous flow of finished pads through the machine. Typical machines take individual pad stacks from one end, jog it, glue it and cool it by the time it reaches the other end of the machine. Some even add a taping process to get that classic finished edge.
As you can imagine, these machines can cost several thousands of dollars, and take a considerable amount of floor space. But if you need to produce a lot of paper pads, they are worth the investment. The automatic machines work tirelessly to produce finished pads without the need for any additional steps, like separating pads that were glued together in a stack.

Let Your Business Decide
Of course, choosing the right type of padding press for your shop depends on your projected need, as well as the investment you can handle. You can start padding tomorrow with an inexpensive tabletop press, a bottle of padding compound, a glue brush and a pad separating knife. The final bill could be less than $200. But if you plan on high-volume production, perhaps an automatic machine is in your future.
Fun Homemade Pads With Kids
As mentioned, making paper pads can be a fun project for kids. You will need only a few easily available items:
- A stack of paper. It doesn’t matter what size, but “smallish” pads are more fun.
- Two strips of wood about 2” longer than the edge of the paper. Make sure the wood is thick enough so it doesn’t easily bend. Pencils work great for smaller pads.
- A couple good rubber bands.
- White glue, like Elmer’s School Glue or Tacky Glue.
While the strips of wood provide a great clamping action, you can improvise your own clamp. The point is to compress the edge of the paper to make a nice pad.
Now comes the fun part.
- Stack the paper and make sure the edge that will be glued is nice and even.
- Take the two wooden sticks and clamp the edge of paper between them. Try to leave the paper sticking out about 1/8” so the wood doesn’t stick to the pad, but you can easily cut the glue if that happens.
- Use the rubber bands to hold the ends of the wood together to clamp the paper tight. It should look something like this.

- Smear a generous portion of glue on the clamped edge of the paper. Don’t let it drip, but more than a thin coat is best.
- Let it sit until the glue is dry. Go out and play. Take a nap. About an hour should do, but read the directions on the glue bottle just to be sure.
- That’s it! Remove the wood sticks and you have a pad of paper!
Let your kids experiment with different kinds and colors of paper to create their perfect pad. You can even cut fun shapes, as long as one edge is flat.